In this post I will step through the process of how to migrate WordPress website to AWS.
My WordPress website was hosted on Bluehost and as my page fully loaded time was 9 seconds which is considered very slow.
The second reason is that during the last six month, my website was down more than five times.
The last time, my website was down for more than 24 hours.
So, my first concern was to change hosting and I was looking for a virtual private server (VPS).
Amazon Web Services was my final choice because I can pay as I go and I can start with a small configuration and scale after when needed.
If you choose t2.micro intance you are elegible to one year free hosting. For more details see my post AWS WordPress Hosting Cost.
How to migrate WordPress website to AWS

I spent time on Internet searching for a method to migrate WordPress website to AWS and I watched many Youtube videos but none was exactly about my case.
So, I took from each method what can work for me and I created my own method.
I did not try any other method I found on the Internet, I just tried first with my own method and it worked the first time.
I have to recognized that I got few errors which took me few days to resolve and I have included them in this tutorial.
Don’t be intimidated by this long article or by the few commands that you have to run on Linux server.
All these commands are included here and you just have to copy and paste them on your Putty session.
It takes three steps to migrate WordPress website to AWS:
- Create EC2 instance and install WordPress
- Backup your WordPress database and files on your traditional web hosting
- Import WordPress database and files and configure DNS.
You don’t have to do all the three parts one shoot, you can do each part separately and if you encounter any error just comment below and I do my best to help.
Step 1 – Create EC2 instance and Install WordPress
Head to aws.amazon.com and create aws an account, you need your banking information in order to create an account.
Sign in to the console https://console.aws.amazon.com/ as Root user.
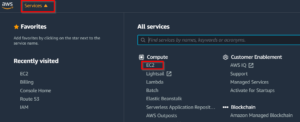
Click on Services at the top left
Click on EC2.

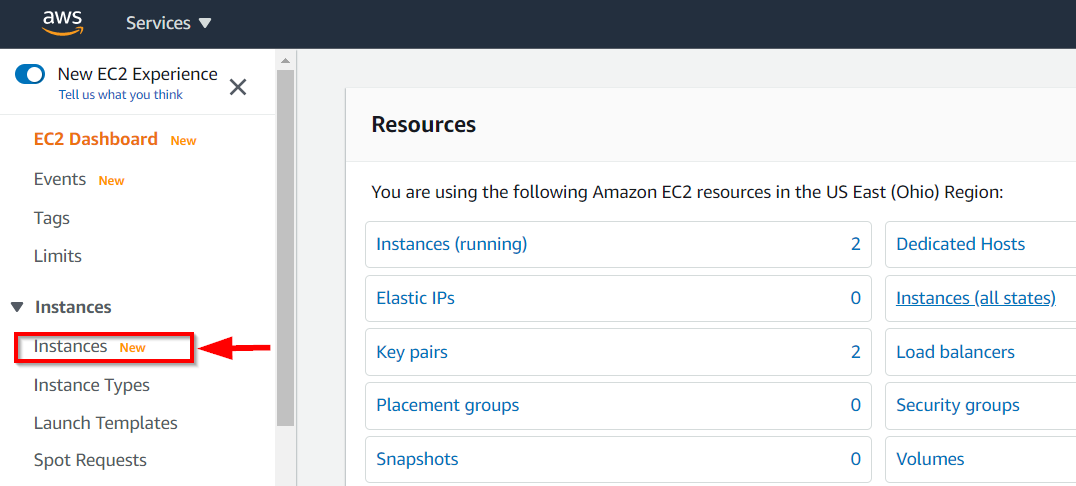
Click on instances on the left side bar.

Click on “Launch instances” on the top right panel.

Select AWS Marketplace on the left, type in wordpress in the search bar and choose “WordPress Certified by Bitnami and Automattic“.

When you click on Select, you will see the pricing details. Click on Continue.

Install WordPress on AWS free tier
Choose t2.micro which is eligible for one year free. Click “Next: Configure Instance Details“.

Set Auto-assign Public IP to Enabe.

Click “Review and Launch” and then “Launch”.
A pop-up windows where you have to create an ssh-key.
Choose Create a new key pair on the first field, specify a name for your ssh-key and click Download Key Pair button.
When downloaded on your computer, click Launch Instances.
Note: Keep your ssh-key in a safety place because you need it later to access your instances with putty and FTP.

The instance is now launching. It will take few seconds to be ready.

Now, back to Services and EC2.
Then Instances on the left side bar.
The Secret Email System eBook
The eBook where you learn the whole Secret Email System.
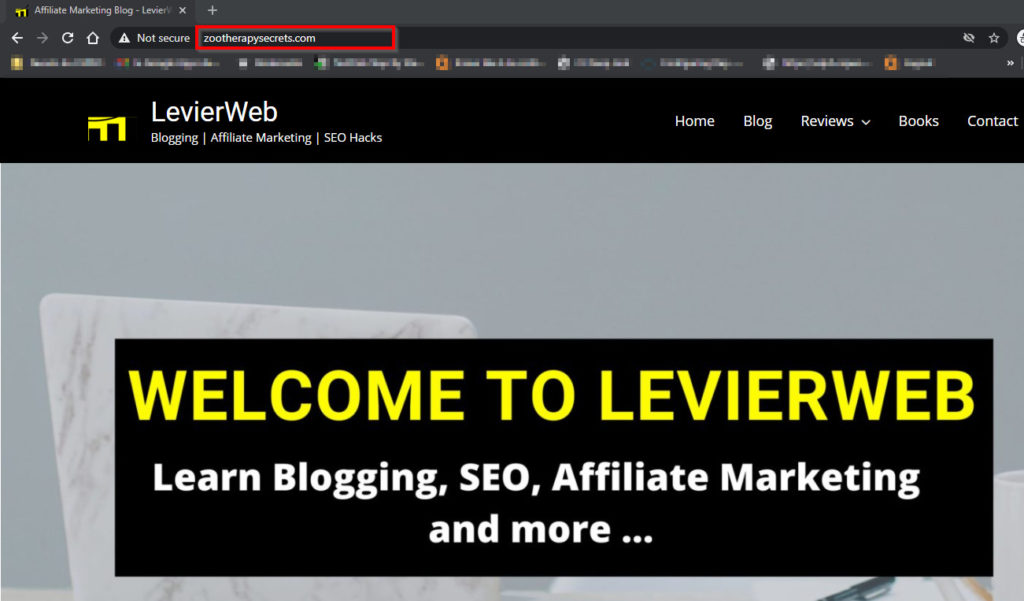
On the right panel, I can see all my instances. I renamed my new instance “zootherapysecrets.com” as the name of my domain.

If you scroll to the right, you will see the Public IP address of your WordPress instance.
If you copy this IP address and you paste it on your Chrome browser, you will see you WordPress Website.

How to access your WordPress dashboard
To access your WordPress dashboard with your public IP address, you need a username and a password.
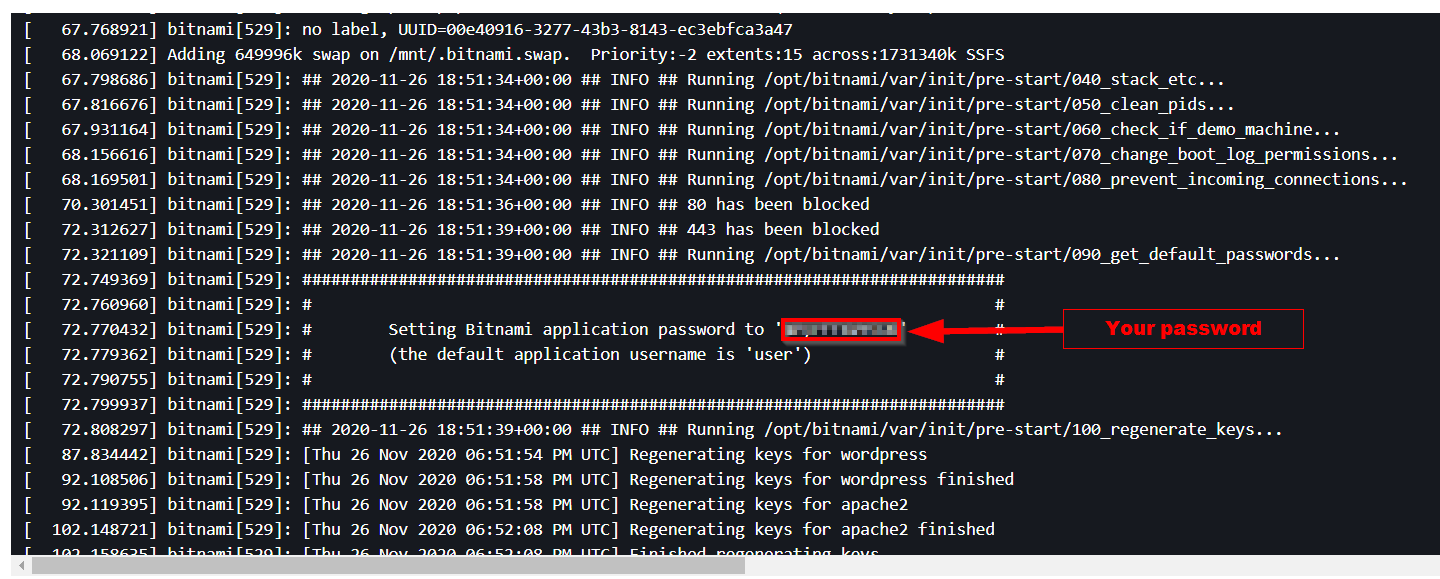
Your default username is user. But how to get your password? Stay tune, I will show you how to find it.
Right-clic on your instance and choose “Monitor and Troubleshooting” then “Get System Log“.

You scroll down a little bit and you should see the password, copy it in a notepad page.

Now, with the username user and the password, you can access your WordPress dashboard.
Juste tape in your <public IP address/wp-admin> and enter in the username filed user and your password in the password field.

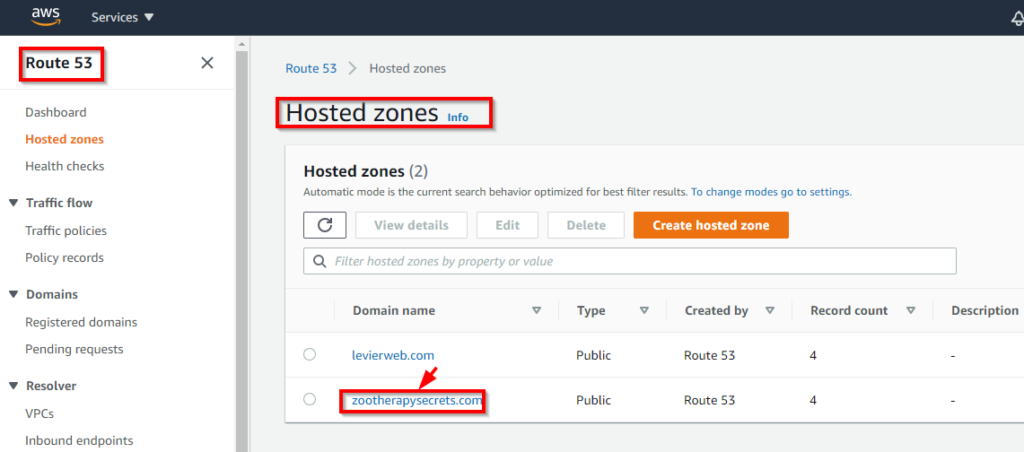
Create a hosted zone with Route 53
Back to Services and choose Route 53 to create a hosted zone for your domain name.


Click on create hosted zone.
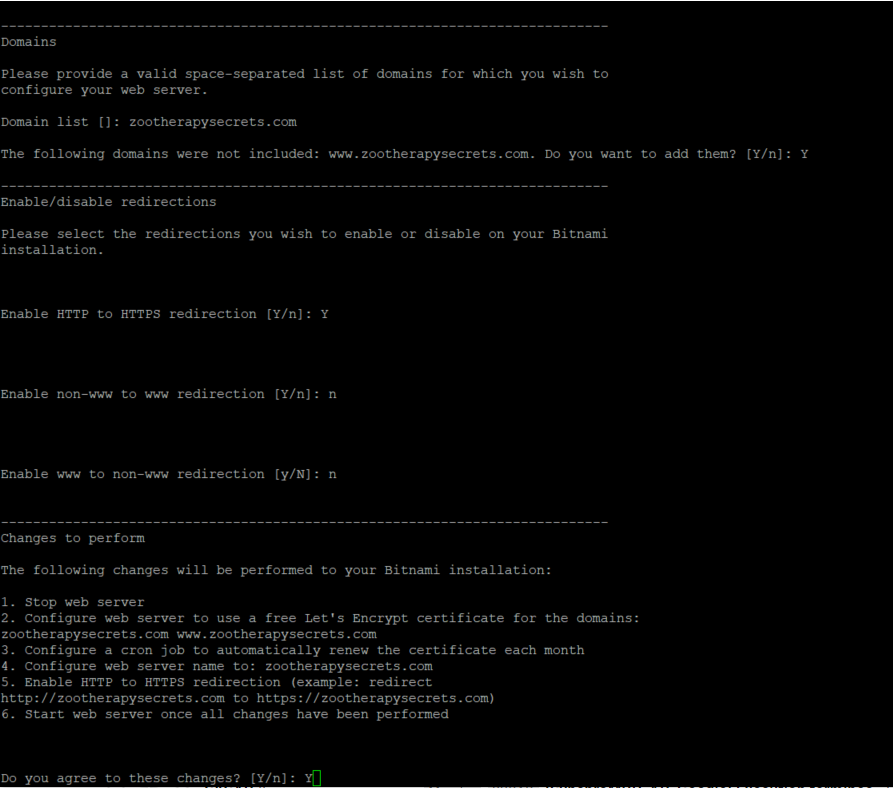
In the Domain name, enter your domain name. In my case is zootherapysecrets.com and select Public hosted zone for the type and click on Create hosted zone.

You have a green message saying that the sootherapysecrets.com was successfully created.
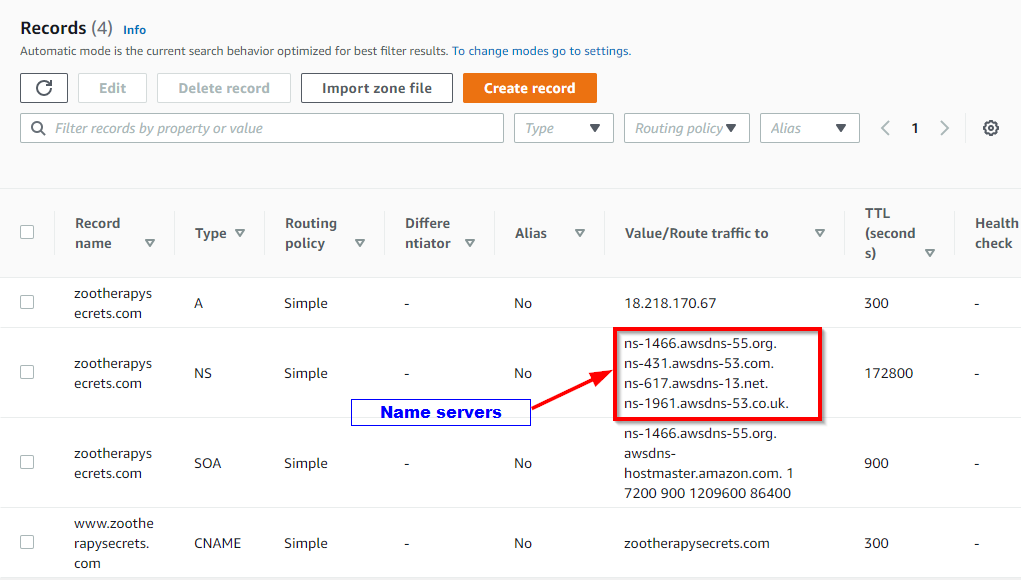
Now, you have only two records in your zone. One SOA (Start Of Authority) record and a NS (Name Server) record.
We have to add two other records. One A (host) record and one CNAME (Alias) record. To do that, click on “Create record”.

Choose routing policy – Simple routing and then click Next.


Click on Define simple record. We are not going to type anything in the Record name box.
This means that when we type only the domain name without WWW, it will redirect to our website.
Value/Route traffic to should be IP address or another value, depending on the record type.
In the value box, copy/paste your Public IP address. Record type is a A – Route traffic to an IPv4 address and some AWS resources.

Click on Define simple record button.

Click on Create records button. Now, the A record has been created. We repeat the same steps to create the CNAME record.
We click again on the Create record button. We choose Simple routing as the routing policy. We click on Define simple record button.
In the Record name box we type “www” without quotes.
In the Value/Route traffic to box, we choose “IP address or another value, depending on the record type” and in the second box below, we type in the domain name “zootherapysecrets.com.
In the record type, it will be “CNAME – Routes traffic to another domain name and to some AWS resources”.

Click on Define simple record button and Create records button on the second screen.
The Secret Email System eBook
The eBook where you learn the whole Secret Email System.

Step 2 – Backup WordPress database and files on cPanel
Connect to your cPanel account
Click on Advanced on the left side bar
Click on phpMyAdmin under Databases and click on your database on the left side. You should see all your tables on the right side.

Scroll down on the right panel and select “Check all / Check tables having overhead“. This will select all your tables.

Then click on “Export” button.

And click on “Go”. A file will be download on your computer with the name “your-database-name.sql“
Now, we are going to export our files. So back to your cPanel dashboard, then click on “File Manager” under Files.

Under public_html on the left side bar, click on your domain name.

On the right panel, click on “Select All” to select all your files.

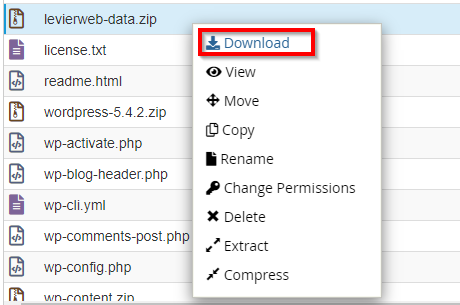
Right-click on the selected files and choose Compress.

Choose Zip Archive and scroll down to rename your compressed file a name “your domaine-data.zip“


Once the compressed file created, right-clic ont it and choose “Download”.
Now, you have two files on your computer:
- your database file (your-database-name.sql)
- Your content file (your-domaine-name-data.zip)
Extract the zip file on your computer.
Step 3 – Import WordPress database and files to EC2 instance
To import our files and database tables in our EC2 instance, we need to connect to our EC2 with Putty. So we need Putty.exe and Puttygen.exe to convert our ssh-key.
How to convert PEM key to PPK
Start Puttygen and click on Load button to load the pem file, then click on Save private key to save the pkk file on your computer.

Close Puttygen.
How to connect to EC2 instance with SSH
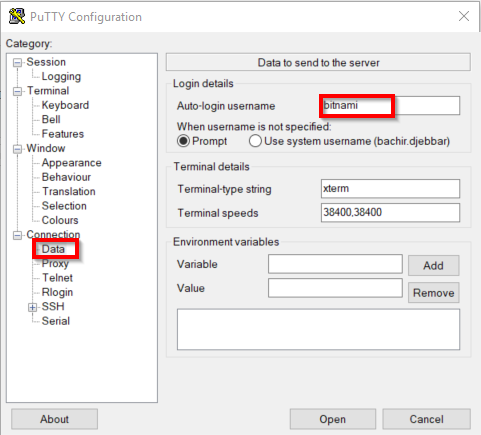
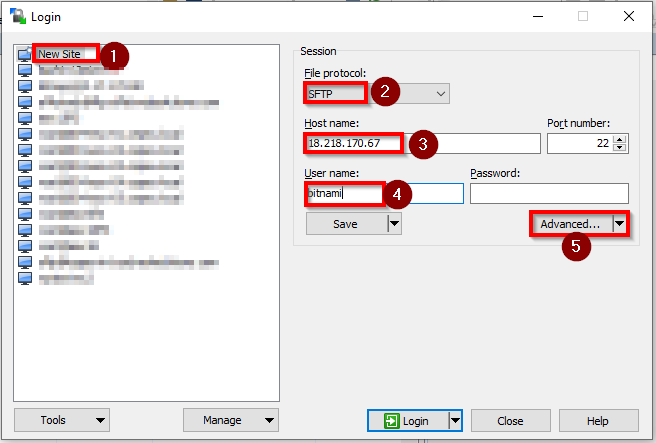
Start Putty, choose Session on the left side bar, copy/paste your IP address in the Host Name (or IP address) box, type in a name for the session in Saved Sessions box and click on Save button.

Click on Data under Connection on the left side bar and type in bitnami as username.
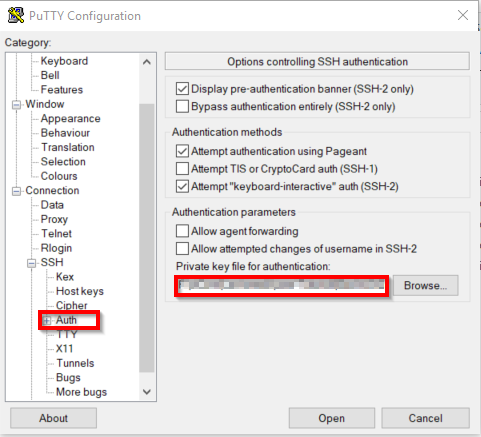
Click On Auth under SSH on the left side bar and browse to your private key (PPK file).
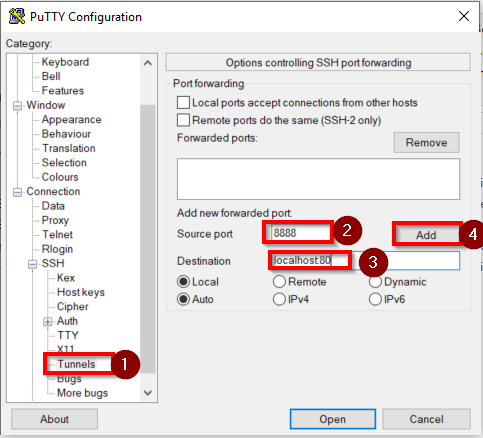
Click on Tunnels on the left side bar, type in “8888” in Source port and “localhost:80” in Destination then click on Add button.
Click on Session on the left side bar and then Save. Click on Open to start an SSH session on the EC2 instance.

How to connect to WordPress database with phpMyAdmin
While the SSH session is connected, start your Chrome browser and type in “localhost:8888/phpmyadmin“

In the username box, type in “root” and in the password, copy/paste your password (the password we used to access WordPress dashboard in the previous steps). Click on “Go” button.

How to Connect to WordPress files with WinSCP
If you don’t have WinSCP, you can download it from here.
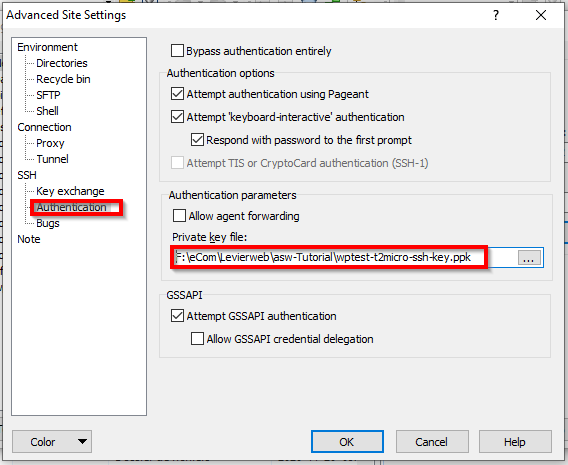
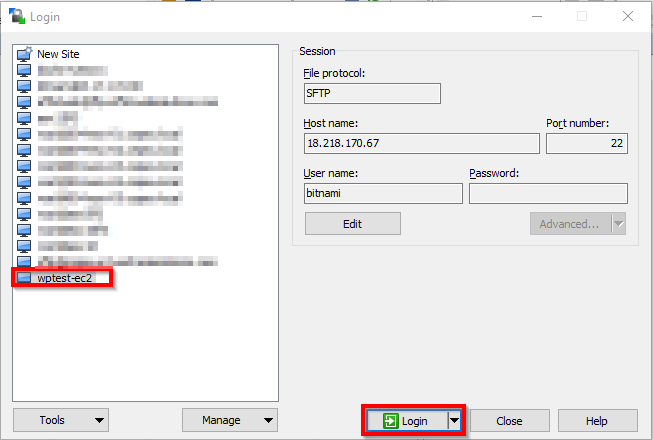
Click on Advanced button (5). Choose Authentication under SSH and then browse to your private key and then click OK.
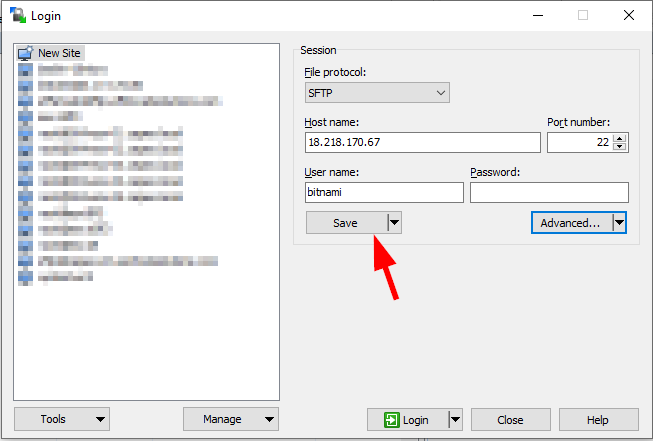
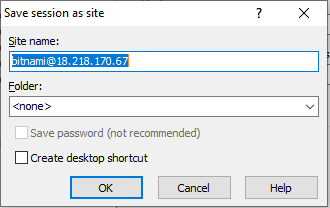
Give a name to your session and click OK.
Select you session on the left side bar and click login to open a session on your EC2 instance.
Database and WordPress files import steps
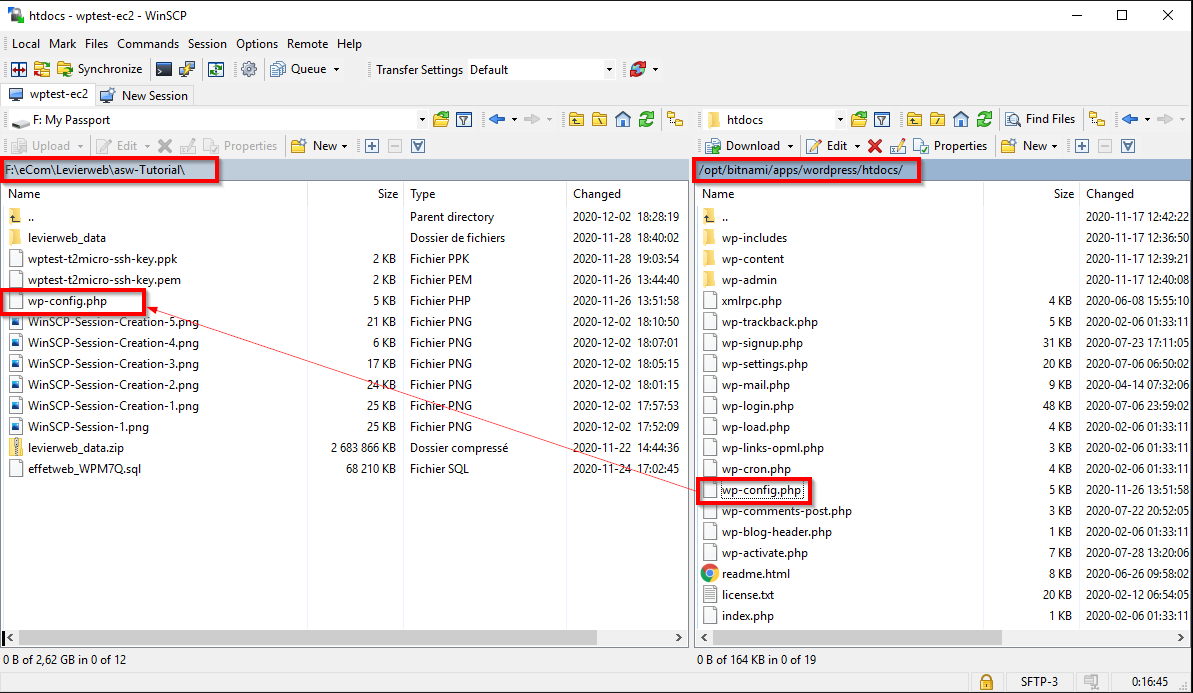
Step 1. Save EC2 instance wp-config.php
Step 2. Delete all the content of /opt/bitnami/apps/wordpress/htdocs folder on EC2 instance
Step 3. Copy your wordpress files to /opt/bitnami/apps/wordpress/htdocs folder on EC2 instance
Step 4. Copy wp-config.php saved in step 1 back to EC2 instance in the folder /opt/bitnami/apps/wordpress/htdocs
step 5. Connect to EC2 instance phpMyAdmin and drop all the tables of bitnami_wordpress database
Step 6. Import your database.
The Secret Email System eBook
The eBook where you learn the whole Secret Email System.
Step 1. Save EC2 instance wp-config.php
- Open a WinSCP session to your EC2 instance
- Browse to the folder “/opt/bitnami/apps/wordpress/htdocs” on the right side (your EC2 instance )
- Browse to your folder on your computer (right side)
- Drap and drop the wp-config.php from the right side (EC2 instance) to the left side (your computer).
Step 2. Delete all the content of /opt/bitnami/apps/wordpress/htdocs folder on EC2 instance
- Open an SSH session to your EC2 instance
- Make sure your are on the right folder, if not sure run this command:
cd /opt/bitnami/apps/wordpress/htdocs

As you see, we have 3 folders (blue names) and many files to delete.
To delete the three folders, use use:
sudo rm -rf wp-admin wp-content wp-includes
To remove all the files
sudo rm *.*
Step 3. Copy your wordpress files to /opt/bitnami/apps/wordpress/htdocs folder on EC2 instance
As htdocs folder is empty now, we can copy our files to htdocs now.
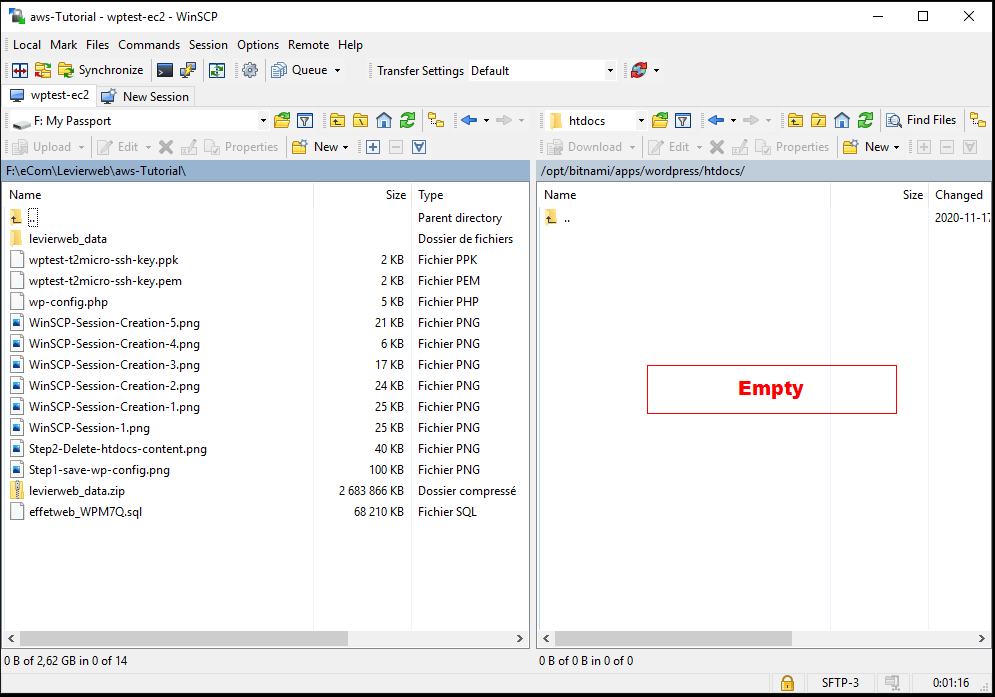
Browse to your files on your computer (left side), select all files and folder and drag and drop them to the htdocs folder on the EC2 instance (right side).
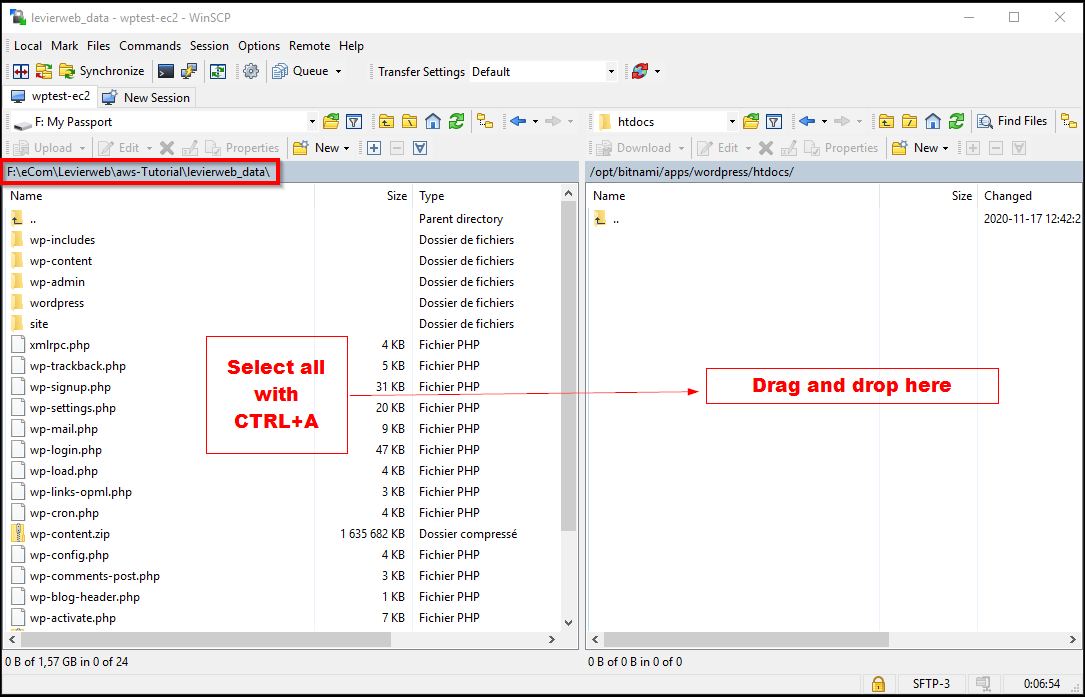
The copy will take time depend on the WordPress content size.
Step 4. Copy wp-config.php saved in step 1 back to EC2 instance in the folder /opt/bitnami/apps/wordpress/htdocs
Step 5. Connect to EC2 instance phpMyAdmin and drop all the tables of bitnami_wordpress database
Select bitnami_wordpress database on the left side, tick “Check all” and select Drop on the right side


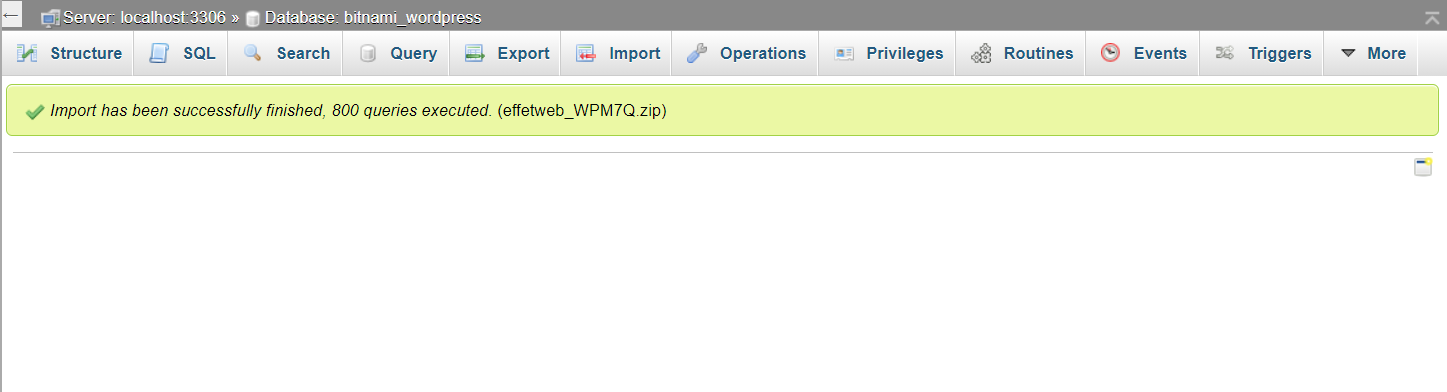
Now bitnami_wordpress database is empty. We import our database from the sql file on your computer.
Step 6. Import your database.
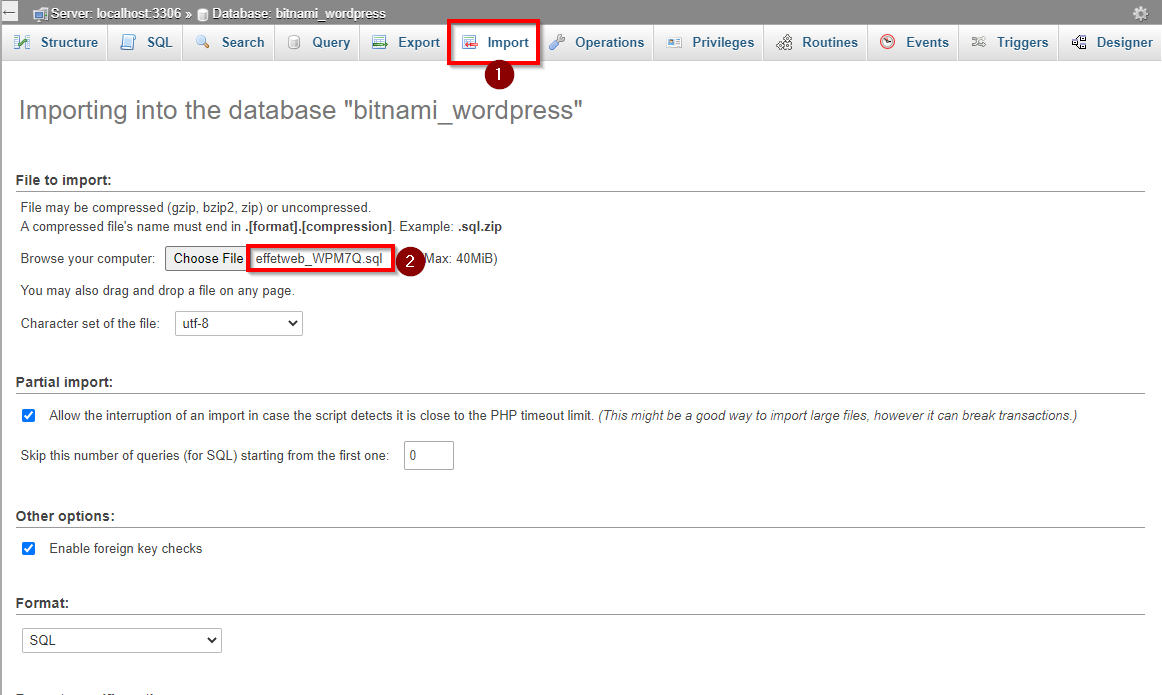
Scroll down and click “Go” to proceed with the database import.
Note: If you got phpMyAdmin error “Incorrect format parameter” may be because the SQL file size is greater than 40 MB. Just compress the SQL file (.ZIP) and retry the import.
We are almost done:
- WordPress files copied to EC2 instance
- WordPress database tables imported into bitnami_wordpress database on Ec2 instance
- wp-config.php file copied back to EC2 instance.
Modify settings
- Change wp-config.php on EC2 instance to reflect our tables prefix.
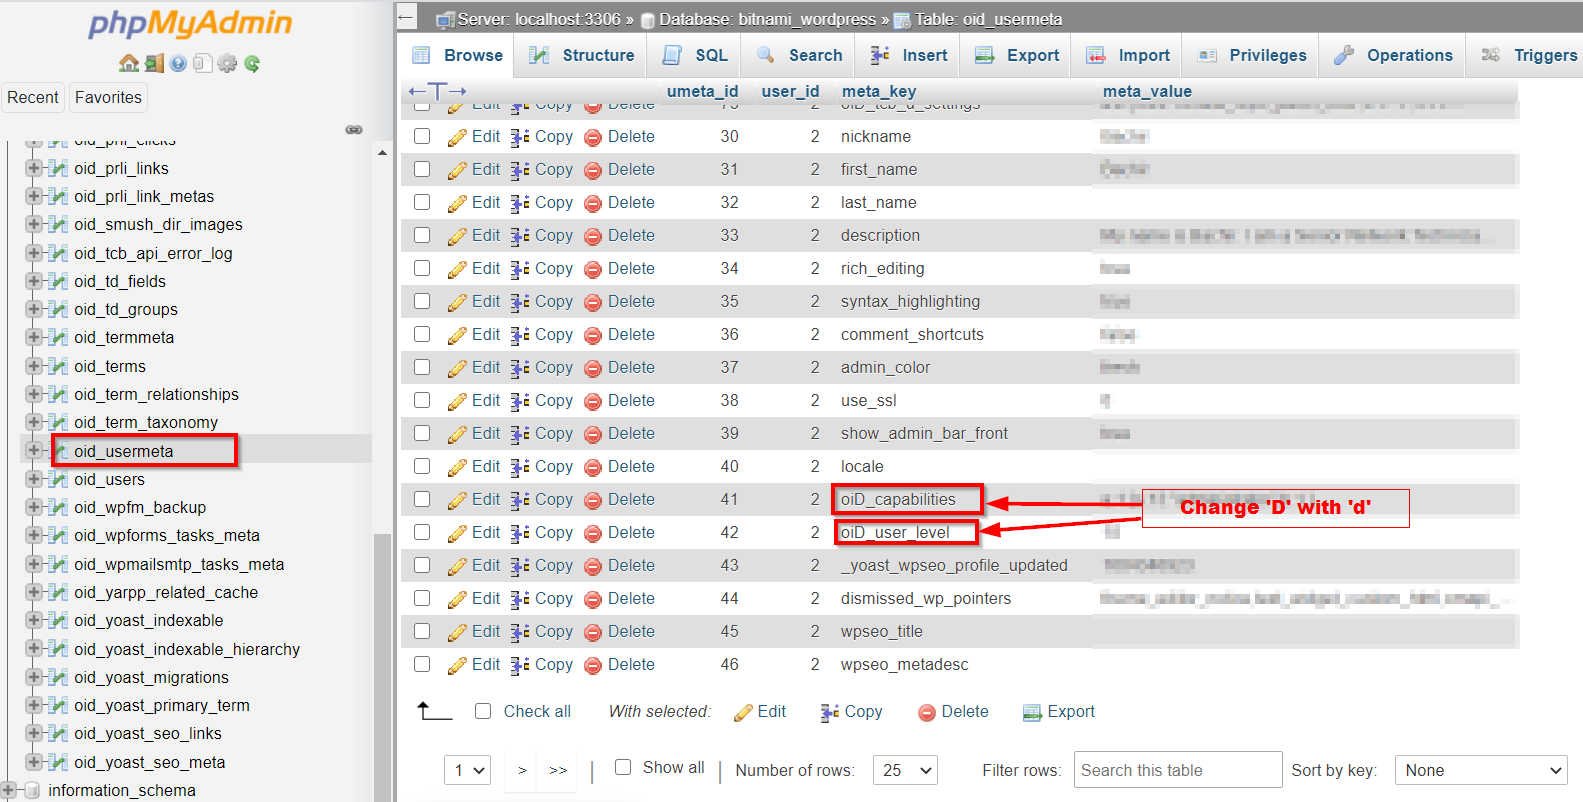
- Make sure that the table xxx_usermeta (in my case, the prefix is “oid” so the table name is oid_usermeta) is correct.
- Change owner of the WordPress files.
- Remove Bitnami baniere.
- Change DNS servers on your registrar
- Generate the SSL certificate.
Change wp-config.php on EC2 instance to reflect our tables prefix
To change anything on wp-config, I prefer to copy it on my computer, make a copy and do the change and then copy it back to EC2 instance. The only thing we modify in wp-config.php is the table prefix.
$table_prefix = ‘wp_’;
Replace ‘wp_’ with your prefix. I my case, it will be:
$table_prefix = ‘oid_’;
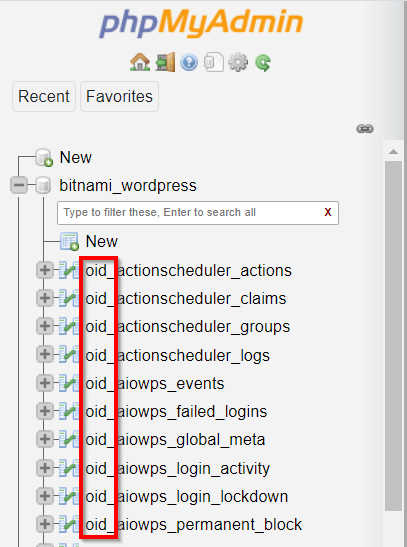
Make sure that the table xxx_usermeta (in my case, the prefix is “oid” so the table name is oid_usermeta) is correct
This change will depend on your table prefix. So, your prefix may be different from what is shown here.
Change the owner on WordPress files
Run the command “apachectl -S” to see what user and group your apache application is running with and change wordpress files owner and group accordingly.
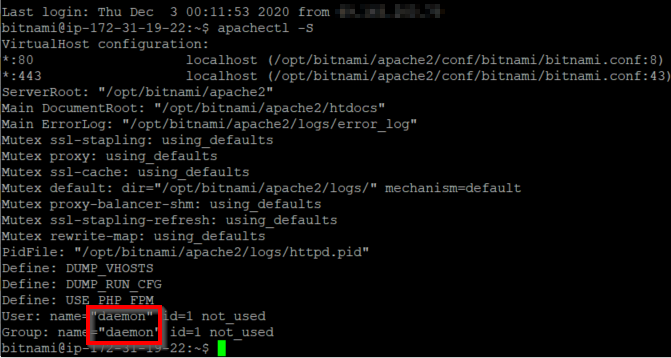
To change wordpress files owner and group, run these two commands:
cd /opt/bitnami/apps
sudo chown -R daemon:daemon wordpress/

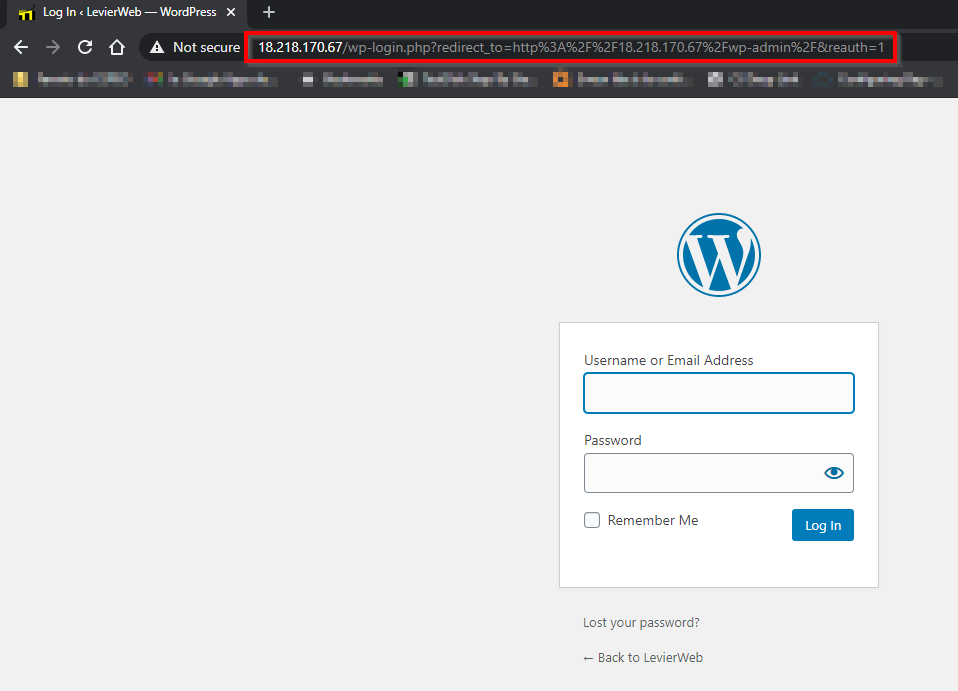
Verify login to WordPress dashboard
http://18.218.170.67/wp-admin/
If you encounter this error “There has been a critical error on your website. Please check your site admin email inbox for instructions.“, that means that one or more plugins are not working properly.
Try rename plugin folders one each and try to access your WordPress dashboard again until you find the faulty plugin.
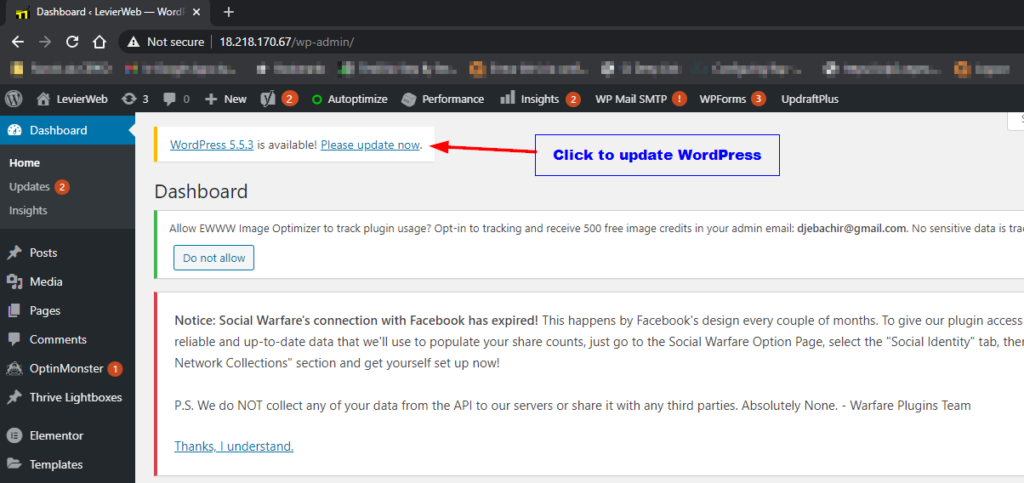
Connect with your old credentials (not with user) and update WordPress.
Remove Bitnami banner
sudo /opt/bitnami/apps/wordpress/bnconfig –disable_banner 1
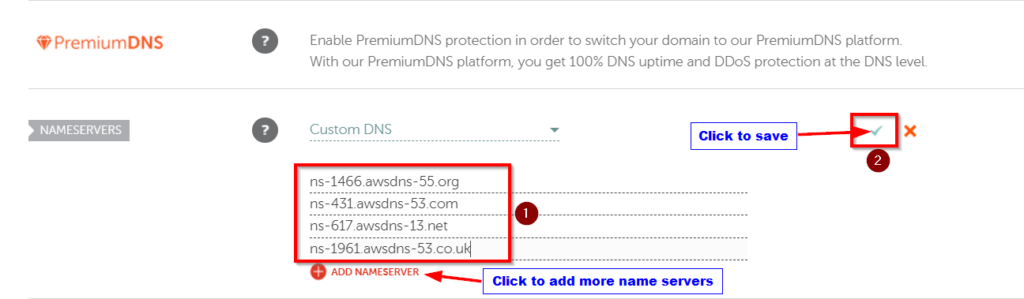
Change DNS servers on your registrar
Change the DNS servers of your domain on the registrar website to pointe to AWS Servers.
Go to Route 53 service and copy DNS servers of your hosted zone.
Click on the zone name.
Copy these four name servers to your domain on the registrar website.
Do nslookup to check the DNS resolution
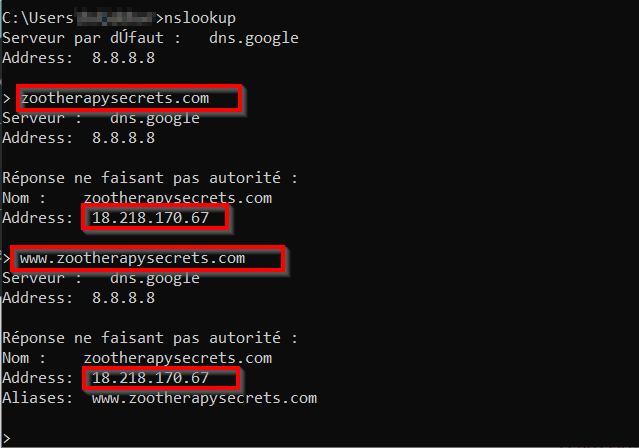
DNS resolution is working fine, so we can use the domain name to access our website.
Generate the SSL certificate
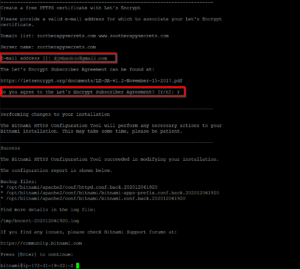
The last thing to do in this migration process is to create an SSL certificate for the website. Run the following command:
sudo /opt/bitnami/bncert-tool
Since my WordPress website is on AWS, my page fully loaded time passed from 9 seconds to 3 seconds.
There is nothing worse for SEO than a slow website.
Hopefully this post can help anyone looking for an ultimate guide on how to migrate his or her WordPress website from cPanel hosting to Amazon Web Services.
If you have any questions regarding any step in this procedure, reach out to me in the comment section below.